
Configuring and reconfiguring Juniper SRX to use LDAPS instead of LDAP
Introduction
LDAPS is the way we are going to set up LDAP connections in the future.
ADV190023 | Microsoft Guidance for Enabling LDAP Channel Binding and LDAP Signing https://portal.msrc.microsoft.com/en-us/security-guidance/advisory/ADV190023
This document will focus on (re)configuring Juniper Networks’ SRX Firewalls to use LDAPS instead of LDAP and it is divided into 2 parts:
- LDAP access profile: This is used to retrieve the group membership of users.
- Active Directory settings for user identification service: This is used to query the domain controllers and PCs for the users.
Existing Juniper SRX LDAP
When handling an existing Juniper SRX LDAP, it is best to first test the LDAPS separately from the currently used LDAP connections. In this way, there is no impact for the customer.
1) Check the current LDAP configuration. For this connect via SSH to the device and configure a new LDAP access profile and a new AD setting. You will need to replace these variables in the configuration below:
- [DOMAIN DN]: This should be the base distinguished name of searches. If your domain is “domain.local” your DN will be DC=domain,DC=local.
- [PASSWORD]: This is the password of the active directory user for the SRX device.
- [USER DN]: This is the username of the active directory user of the SRX device. If your user is in the “Users” OU, the DN of the user will be something like CN=Juniper SRX,OU=Users,DC=domain,DC=local.
- [DOMAIN CONTROLLER]: This is the hostname of a domain controller. If you have more than one domain controller, run this set command with the other domain controller hostnames (for up to 6 other domain controllers total) for redundancy.

2) User ID Service
Configure the user ID service to query the domain controllers. You will need to replace these variables in the below configuration:
- [DOMAIN]: This should be the active directory domain name eg. domain.local.
- [SRX USERNAME]: This should be the short format of the SRX username for Active Directory.
- [PASSWORD]: This is the password for the active directory user of the SRX device.
- [DOMAIN DN]: This should be the base distinguished name for searches. If your domain is “domain.local” your DN will be DC=domain,DC=local.
- [DOMAIN CONTROLLER]: This should be the IP address of the domain controller
3) Check if you can establish a connection to AD checking logs and the following commands:show services user-identification active-directory-access domain-controller status
show services user-identification authentication-table authentication-source active-directory. And you can check using wireshark to make sure that the connection is being encrypted.
4) Should the connection give an error, then either there is an issue with the certificate or with the communication between AD and Firewall. Normally the root CA certificate should already be in the trusted list (as this is an existing installation), but you can always check and if necessary, import the new CA. Also, make sure that the AD allows LDAPS.
5) Now that the connection has been modified you can remove the old configuration, using “delete” command to remove the old LDAP access profile and AD settings.
New Firewall installations
1) The first step is to install the CA certificate and make sure that is placed as trust Certificate Authority, you can use HTTPS in this step:
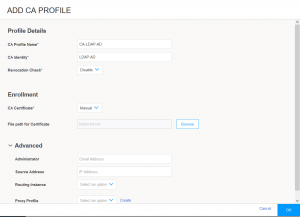
Fill the fields above and import the CA certificate. Or use CLI to do it:set security pki ca-profile Root-CA ca-identity CA-Root
set security pki ca-profile Root-CA enrollment url http://[ DC_IP ]:8080/scep/Root/
set security pki ca-profile Root-CA revocation-check use-crl
2) Check the certificate:show security pki ca-certificate
show security pki ca-certificate detail
3) Connect via ssh to the device and configure a new LDAP access profile and a new AD setting.
DONE